3.0L M5OD Clutch Swap
(Graphics intensive, please be patient)
Aaaaargh! ...not again!
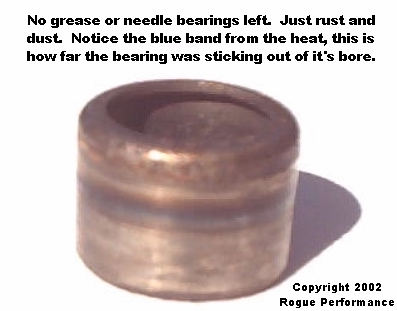
Here's the culprit!
Boy how time flies. Just 70,000 miles ago I was in there for the very same reason, the pilot bearing. At least those are my only clutch/trans related problems to date. I can't complain since I tow a 3,500lb trailer in the mountains! I won't bore you with the details of the removal/installation, as those are in your manual. This is just a "Meat and Potatoes" page covering the CenterForce® Dual Friction® (from MotorHead.com) install and some helpful tips.
Here is my first hurdle: My Radius Arm Brackets were severely tweaked by the original owner. Since the truck ws going to be down a while, I decided to replace them.
I am not big on taking any short cuts inside the bellhousing. It's just too much of a pain to keep dropping the trans because you wanted to save a few bucks. My recommendation is to replace everything inside with new parts of equal or higher quality than original. The pilot bearing is normally overlooked, as is resurfacing the flywheel. Together, they are < $30 and take just an extra hour or so, but they will save time and money in the long run! If you have problems with "clutch-chatter", the resurface will cure them!
(wiggle your mouse over the thumbnail for more reading time)
 |
 |
 |
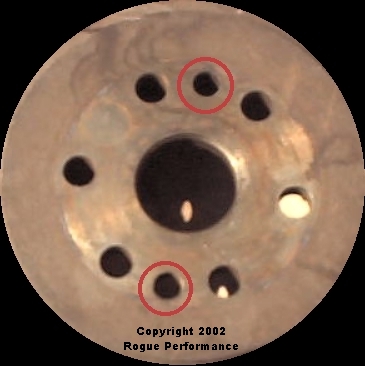
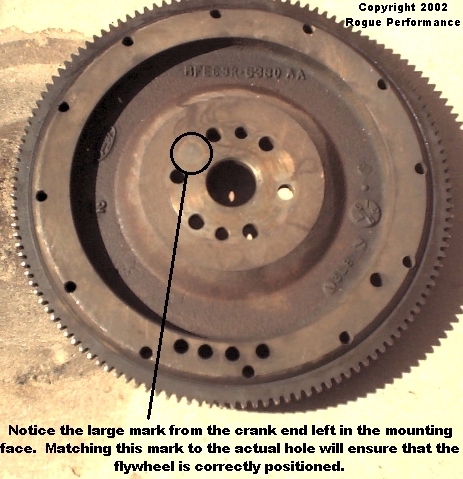
![The books are vague on how to torque your freshly surfaced flywheel, so here is the torque pattern. Each bolt was thoroughly cleaned and treated with LOCTITE® 242® before the 3-step torquing process [20-40-60ft/lbs].](pix/flywheelbolts.jpg) |
![Here is a comparison of the new Ford style slave cylinder [left] and the old style [right]. Same price, but the new style is far superior. Ford used the same slave cyliders for all year/engine Rangers, so getting the right one is easy!](pix/slave.jpg) |
 |
![While the slave cylinder gets settled in it's new home, it's time to make sure the trans is ready! It is far easier [and neater] to install the transmission while it is empty. This is also a good time for a new rear seal on the tail shaft!](pix/trans.jpg) |
![The alignment tool holds the clutch disc in place while you install the pressure plate. Again, using thoroughly cleaned bolts, LOCTITE® 242®, and the 3-step torque sequence [10, 15, 20]](pix/clutch.jpg) |
(Weeks Prior)
-Get all the parts you will need:
- Pilot Bearing
- Bearing Puller w/ slide hammer (My last 2 pilot bearings needed 10-12 hits with the 5lb slide hammer to remove...)
- Engine Rear Main Oil Seal
- Ford Rear Main Seal Installation Tool (or a large socket/section of pipe)
- Local Machine Shop to do the flywheel resurface/lightening
- Pressure Plate and Clutch Disc (MotorHead.com, $241)
- Slave Cylinder/throwout bearing combo (New version Ford P/N: YL5Z-7A508-AA, ~$70)
- Sealed bottle of brake fluid (I prefer synthetic) for bleeding/flush
- 3 Qts (Book says 2.5, but mine took almost all 3) MERCON ATF (again, I use synthetic)
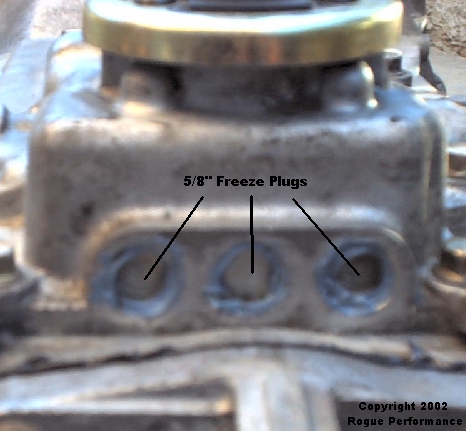
- 3-5/8" freeze plugs (shifter plug mod)
- 1 Tube gasket sealant (for plug mod)
- Upper and Lower shifter bushings (about $8 from Ford, gets rid of all the shifter slop)
- Shifter Mounting Plate (top of trans, rubber is normally separated)
- 1 small tube of LOCTITE® 242®
- Transmission Tailshaft Seal
- Transmission Mount (~$30)
- Clutch Alignment Tool (less than $4)
- 1-4 O2 sensors (Hey, you're right there... you might as well replace them while they are accessible!)
- 1 tube of "Anti-Seize" for all the exhaust bolts
-Arrange for a "parts-chaser" or rental car, at a bare minimum you will need a ride to the machine shop.
(One Day Prior...)
-Spray everything with Castrol® "Super-Clean" (or similar) and hose clean.
-Blast all the exhaust bolts with a penetrating oil and let them soak!
-Drain the trans fluid, it's cheap and much neater to remove an EMPTY trans!
(Day of...)
-Push the vehicle to the freshly swept work area. (You don't want to lay on a wet/oil stained work area, do you?)
-A transmission jack really helps, especially if you have the Radius Arm Brackets in place.
-Get the jack inplace to support the transmission.
-Drop (figuratively speaking...) the transmission crossmember/trans mount, (Notice the way the catalytic convertor hanger is installed, there will be a test later!)
-Drop the "Y"-Pipe and cats as one piece.
-Disconnect the reverse switch connector (top/middle of trans).
-Disconnect the Speedo-Cable.
-Place a wood block between the oil pan and the "I" beams to keep the engine from tearing the mounts.
-Unbolt/slide out Transmission.
(Once it's out...)
-Check for damage or unexpected problems.
-Check to be sure the shifter plug mod is done.
-Replace the Shifter Bushings and tailshaft seal.
-While the engine is on an angle, the "Oil Pressure Sending Switch is easily accessible. Good time to do the "Idiot-Gauge" mod! (I'll have a page on this later...)
(Installation...)
-Although the instructions say "Don't rest the input shaft on the pilot bearing", how would you know?? Another good reason for the Transmission Jack.
-The engine and trans have to be in the same plane (3 axis) or there will be problems.
-The trans will not get any closer than 1/2" from seating due to the pressure from the slave cylinder. Make sure the slave cylinder is connected to the clutch line and then use the lowest bolt holes (with the alignment dowels) to pull the trans in to seat.
-Reattach the speedo cable (with a new cable end gear if you have not calibrated it since you installed your new tires!!).
-Reattach the reverse switch connector (top/middle of trans).
-Check/replace the O2 sensors while they are out.
-Using a standard hydraulic jack under the tailcone of the trans (in place of the trans jack), lift the tranny to within 1" of the trans tunnel.
-Install the "Y"-pipe end of the exhaust first (using 4- M12/1.75-50mm Stainless Steel Bolts and "Anti-Seize"), then the cat end.
-Install the new transmission mount to the trans.
-Install the catalytic converter bracket on the hook welded to the cat. The "R" faces rear, and the raised ribs (either side of the mounting bolt hole), face up (trans side).
-Now, you can install the transmission crossmember.
-REFILL THE TRANSMISSION WITH MERCON ATF
(Just so you don't forget!)Now, double check everything and enjoy!
Free counters provided by Andale.